After the partition of HDD is done and the installation media has been set up, we are ready to install linux into your PC or Laptop. If you haven't done any of those steps above, you can read them here:
To install SolydX, boot your machine to the installation media either USB or DVD media and wait until the live session is ready.

Click the install icon at the desktop.
Select language and click forward.
Select your timezone/region and click forward.
Select the keyboard layout and click forward.
No need to put picture here. Unless you want to put your own photo or you have another picture saved, you just only have the default picture as a choice. Write your name, user name, password and the host name and click forward.
Select the harddisk you want to install SolydX into. In most cases is /dev/hda.
The picture shows the /dev/hda is my local hdd, and /dev/hdb is my usb hdd as an installation media.
Click forward.
If you never install linux before and have done the
Setting Up The Partition Under Windows step, you should see unallocated list with size equal to the list shown at disk management software on Windows.
Right click the unallocated and select new from the menu.
Create new partition with linux-swap file system from the dropdown menu with the size twice your ram. If you have 1 Gb ram at least you create 2 Gb of linux-swap file system.
Create an ext4 for the rest of the unallocated hdd.
Right click the new partition and choose edit.
Set the mount point to swap-area for the swap partition and / for the ext4 partition.
Check the Install GRUB and make sure no number is selected on /dev/hda.
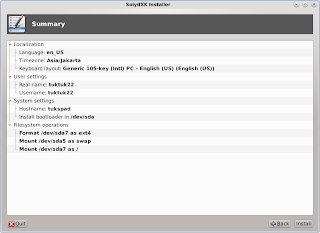
Click Forward and The Summary installer windows will appear. Click install.
The installation progress should take 15-30 minutes.
After it finished, reboot your machine and let it boot from your hard drive.
Enjoy your SolydX OS ^^


 Click the install icon at the desktop.


Like!! Thank you for publishing this awesome article.
ReplyDelete==> Click here to read simple method how to reset windows